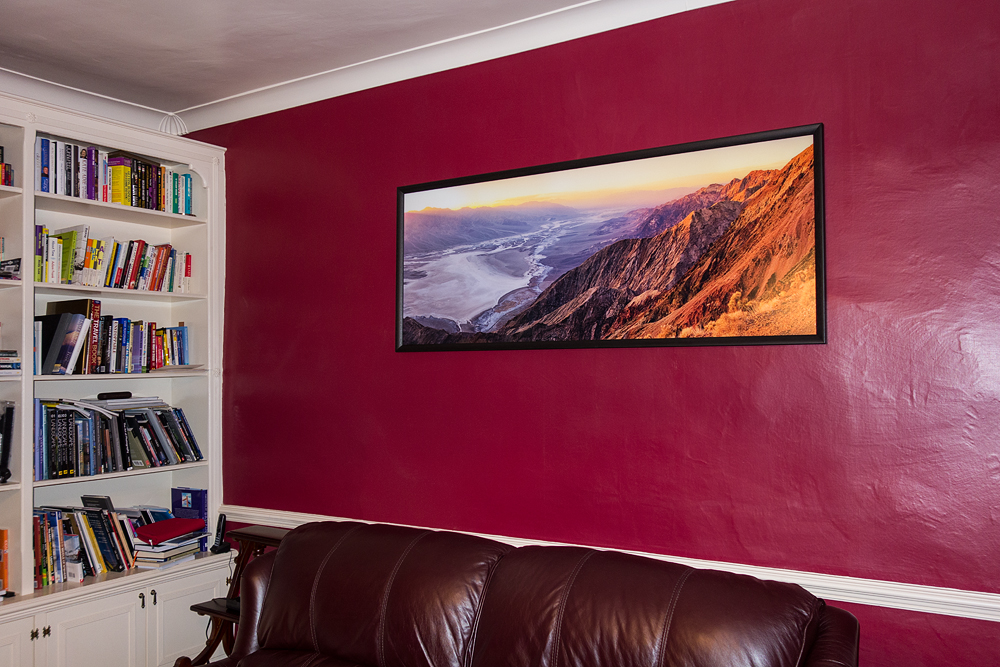
Here’s something that I have wanted to do for a long time, produce a large print from a Micro 43 camera. When I say large, this one is 62″ x 25″. As you can see from the picture here, the print is just a few inches short of the length of the Sofa (which is a 3 seater).
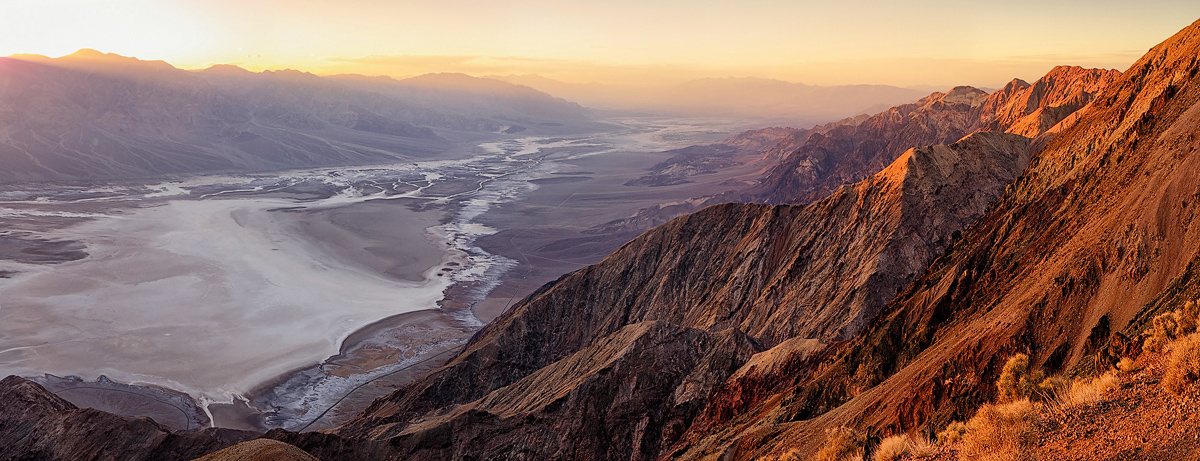
The image was shot in Death Valley and is actually 4 images stitched (with a 50% overlap). The images were shot using a Panasonic GX1 which was tripod mounted and the stitching was done in Hugin. In case you are not aware of Hugin, it’s a freeware stitching application (that’s the simplest way to describe it) which I absolutely love. Here is the resulting image which I have previously shared on this blog.
And in case you are interested, here is a section from the bottom right which is shown at 100%. This section has been taken after the image was resized to create the print above. This is approximately a 200% increase in the print size and was achieved using Akvis Magnifier.

I had the image produced by White Wall and I am very impressed with the quality and service. It’s actually a Lambda print on Fuji Crystal Archive DPII. The print has then been bonded onto Aluminium Matt Acrylic glass and the whole thing has been framed. I have to say, I am impressed and can certainly recommend White Wall from my experience.
There are however a few things to watch out for when producing a print of this size as its quite an investment:
- Ensure that you download the colour profile for the paper/print process you are going to use. You should then soft proof your image and check for out of gamut colours. When I did this I found that some of my orange highlights were out of gamut and if I hadn’t corrected this the image would have appeared flat.
- Sharpen your image at the final size before you upload it. The White Wall ordering workflow allows you to upload your JPG or TIFF image. It’s then possible to select a larger image and have the system scale this for you. I preferred to scale my image first so that I could sharpen this for the final output.
- If you follow my approach and scale your image before upload, I suggest printing a number of sections from the finished image (at 100% resolution). This enables you to judge the quality of the finished image before committing to the transaction.
- Now that I have the print I have checked the sample print I made and can directly compare the sharpness and detail. The White Wall print is very good and compares favourably with the image sections I printed on an Epson 3880. The Epson is however slightly sharper. If I were repeating the exercise I would add a little more sharpening. At the time I used Nik Sharpener Pro which allows you to set variables such as viewing distance and resolution. I used a viewing distance of up to 2 feet and a resolution of 2880 x 1440. Looking at the results I should probably have set the viewing distance to “6 to 10 feet” or perhaps even used the Continuous Tone option at 300dpi. It might even be an idea to contact White Wall and ask for a little more information on the Lambda printer as well as recommended Output Sharpening levels.
The only regret that I have is that I picked the Matt Acrylic Glass. One of the things that prompted me to do this was a visit to the gallery of Rodney Lough Jnr. when I was in San Francisco. The images in the gallery appeared to use a similar process (although it was suggested they did this in house and it was unique – I doubt that).
My reason for choosing matt acrylic was to avoid reflections but it doesn’t really. I really wish I had gone for the gloss and tried to counter the reflection with some good lighting – something I still need to invest in for this print.
I suspect I will try another print but this time on gloss and not quite so large.

Its a beautiful pic you chose for this print.
Thank you. I had to be sure when spending this sort of money that it’s one I wouldn’t tire of. It was also a wonderful trip so it brings back good memories.
Very nice. I’ve been ‘playing’ with some panoramas but have yet to mount one yet — it’s always been a problem deciding how to mount these large prints! (Plus have the wallspace to show them.) Your comments about the finish on the acrylic are helpful and I’ll keep them in mind when ordering a acrylic mount for my own prints.
Many thanks,
Dave
No problem. I you decide to have one done and have any questions about my experience just send me an email.
“The images in the gallery appeared to use a similar process (although it was suggested they did this in house and it was unique – I doubt that).”
Don’t doubt it. It is different – both process and material is vastly superior and done in house just like they tell you.
Well, I agree on some parts of this. A process where I as the artist take control of the entire print process is better. If that wasn’t possible then why would I go to the trouble and cost of buying a wide format inkjet to make my own prints. I therefore agree that the process followed will be superior and most likely result in higher quality prints. What I disagree with is that Fuji make a version of Fuji Crystal Archive DPII which is only available to a handfull of photographers. Unless this is purely for R&D purposes, I can’t believe it. Equally, the Lambda print process is the same technology although different equipment will produce different results as it the case with inkjets. In case I sound like I am being unkind to Rodney Lough, I’m not intending to be. His work and especially the prints were truely exceptional.
Hi Robin, I have just tried using Hugin & it is failing on me with:
All images are connected. Optimise project… TIFFFetchNormalTag: Warning, Incompatible type for “RichTIFFIPTC”; tag ignored. TIFFFetchNormalTag: Warning, Incompatible type for “RichTIFFIPTC”; tag ignored. make: *** Access is denied. . Stop. make: *** Waiting for unfinished jobs….
I am using TIFF files but I notice that in the online procedures that it gives you two JPEGS to run an initial practice session (I chose to use a couple of TIFFs as they were taken to produce a pano back last winter. Does this package only work with JPEGs?
Regards Paul
Hi Paul,
The package works with TIFF as well as JPG. Out of curiosity, which software was the TIFF file produced with? I have had a couple of instances where software has complained about TIFF files produced in CS5. It looks like from the warning message you are getting that this is an enhanced TIFF file format. I am wondering if this is some “enhancement” Adobe introduced and Hugin doesn’t like it.
Regards
Robin
I have installed exhibits in galleries and large framed pictures in homes. My favorite drill bit to prevent wandering, oversize holes, and wall damage is the ceramic bit that has a spade-shaped carbide blade. I start with the smallest size and increase it incrementally. This should work well on fragile plaster walls, but I recommend first putting a piece of blue masking tape on the spot before marking the hole location and patiently drilling with a variable speed drill with drill guide attachment.