
Readers of this blog and my website will know that I am a fan of the Xrite Color Checker tool. This can be used to create colour profiles for your digital camera and they can make a big improvement to the colours in your images. My own experience has been that without exception they are an improvement on those Adobe ships with its software.
Whilst the camera profiles are great, installing and using them can seem a bit daunting at first. Here then is my guide to downloading and using Camera Colour Profiles with Adobe Lightroom and Adobe Camera RAW.
What are Camera Colour Profiles
These are information files that allow Lightroom and Camera RAW to translate a camera’s RAW file data into colours correctly. Without these profile you might find that lovely shade of Red coming out as Purple in your images.
Where Can I Find Colour Profiles
The easiest way (although some people might argue) is to buy the Xrite Colour Passport Checker. Unfortunately that cost money and not everyone wants to take the risk that it will improve the conversion of their RAW files. If you belong to a camera club or photographic society, it might make a sensible group purchase.
An alternative approach is to search on the Internet to see if you can find someone who is selling or giving away (who would be that daft) a profile for your camera. To be honest, this is a bit of a long shot and very few people seem to publish these profiles.
The final alternative is to download the free profiles I created (did I say who would be that daft) from my Lenscraft website . Currently available profiles are Panasonic LX5, Sony RX100, Sony RX10, Panasonic GX1, Olympus EM5 and Panasonic GM1. As and when I change my cameras I will be adding to the available profiles.
How do I install the profiles
Each software application that can use colour profiles is likely to have its own locations from which to access these and probably also use different approaches to installing the profiles. Whilst you can install the files by simply copying them to the correct folder, finding the folder can sometimes be a little tricky. You will need to find the “Adobe\Camera RAW” folder which is where these profiles should be saved, to make them available in Lightroom and Camera RAW.
On my Windows 8 PC the folder location is
C:\Users\rnwhalley\AppData\Roaming\Adobe\CameraRaw\CameraProfiles
Something similar will no doubt exist on the Mac.
Xrite also produce a rather neat solution which is the “DNG Profile Manager”. The tool is available for download at Xrite website
http://xritephoto.com/ph_product_overview.aspx?ID=1257&Action=Support&SoftwareID=1345
Once the tool is installed, run it and select “File | Open DNG Profile Folder”. This will open the location where the colour profiles are to be copied to. When you have copied the colour profiles to this folder they are installed and will be available in Adobe Lightroom and Adobe Camera RAW.
How can I use these profiles
In Lightroom you need to open the Develop Module so that you can change the development settings for your images. In the Develop module you will find the different development options down the right side of the screen. At the bottom of these is the “Camera Calibration” tab.
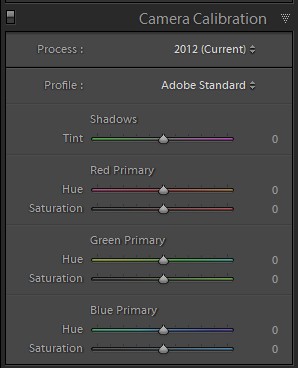
Notice near to the top of this section is a drop down list called “Profile”. By default this is set to “Adobe Standard” but click on it and you will reveal other profiles for your camera. The profiles are sensitive to the RAW file format so only those compatible with the RAW file will be displayed.
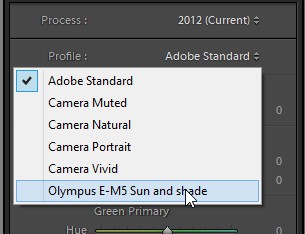
In the following shot you can see the “Olympus E-M5” bespoke profile I created being selected.
In Adobe Camera RAW the Camera Calibration tab is also on the right side of the screen. It can be selected by clicking on the icon of the camera as shown below. There is then a drop down list of the installed “Camera Profiles”.

But I can’t see a Colour Profile
If everything has gone well you should be able to use the newly installed profiles but there may be occasions when you can’t see your profile. Here are a few of the possible problems:
- The RAW file you are processing came from a different camera to the profile. For example if you are processing a RAW file from a Canon 5D MKII, you wouldn’t see a profile for the Olympus EM5 in the drop down list. You only see those profiles that are compatible with the type of RAW file you are processing.
- You installed your camera profiles correctly but it may be that you did this when Camera RAW or Lightroom were open. Until you restart the software the new profiles won’t be visible/available.
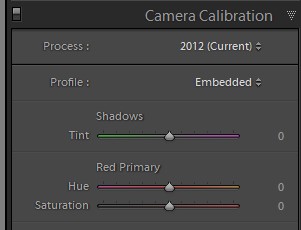
- You may not be processing a RAW file but a TIFF or JPG image file. Under these circumstances you won’t see the camera profile in the Calibration tab. Instead you will probably see the word “Embedded” as shown below.
I hope this helps all the Lightroom and Camera RAW users out there.

Robin, would your lx5 profile work for the LX3 ?
Unfortunately not. The software recognises which camera the RAW files have been saved by and matches it to the profile. There’s no way that I know of to fool it.
For Mac users, if Robin’s excellent instructions above are insufficient, see also the information courtesy the ‘Lightroom Queen’:
http://members.lightroomqueen.com/Knowledgebase/Article/View/1373/205/lightroom-5-default-locations#7
The steps are:
Mac—Macintosh HD / Users / [your username] / Library / Application Support / Adobe / CameraRaw / CameraProfiles /
(Also for lens profiles, substitute the LensProfiles folder for the CameraProfiles folder.)
Then as stated in the article, in LR5 to access the settings it is Windows>Panels>Camera Calibration>Left side panel settings.
Thank you for sharing the additional information. It’s very helpful. I must buy a Mac sometime.